Writing Workflows
Before you begin:
-
Have CERN Username, Password and GitLab personal access tokens with
read_registrypermissions. Note: The personal access token should be created using a user account (not with a service account). -
Get in touch with the Analysis Preservation Contact (atlas-sw-analysis-preservation-contacts@cern.ch) to request:
- A dedicated space for your analysis in the central recast project area on EOS (
/eos/project/r/recast/atlas/<your_analysis_dir>). - A dedicated repo for your analysis in the recast-atlas group on CERN's GitLab to store your workflow spec files.
- A dedicated space for your analysis in the central recast project area on EOS (
Important
Please indicate your analysis reference code (eg. ANA-EXOT-2020-04) when making the request.
Recommended Plan of Attack
- Armed with Docker Images, write first the
steps.ymlspec for each step in the workflow and add tests to make sure they work - Once you have
steps.ymlit should be easy to writeworkflow.yml
Introduction
The best way to write a workflow is to set up a dedicated repository for it, e.g., on CERN GitLab. We strongly recommend maintaining your workflow in the dedicated recast-atlas group on gitlab (see step 3 in before you begin to set this up).
The repository will hold several files. The top-level entrypoint file is the "catalogue entry" file, typically called recast.yml at the root of the repository. Using this file, you can:
- Specify some metadata about the analysis.
- Specify where to find the workflow.
- Specify tests to check individual aspects of the analysis.
- Specify how to find the result of the reinterpretation.
We will refer to the catalogue entry throughout these docs.
Prerequisites
Before getting started, make sure you have:
- CERN account information (either your personal account or a service account, if you are working in a group).
Note
If you are using a service account, make sure that it has all the necessary rights to access the repositories of your analyses that you want to interface with your workflow. It's best to just treat the service account as a "Developer" in the GitLab interface.
In the docs we will refer to the account username and password as the variables RECAST_USER and RECAST_PASS respectively.
Important
Add the account named recast with at least Reporter permissions to any analysis repositories that you will want to interface with your workflow (e.g. a repository that hosts a Docker image you need to pull).
This is strongly recommended for all repositories and it is required if the repository you want to access is GitLab private.
-
A personal access token for the account. This token should be created using a user account (not a service account). The token will be used in order to access the Docker images of your analysis. See the official GitLab Docs for details on how to create one - the token should be created with at minimum
read_registryscope. We will refer to the token asRECAST_TOKEN. -
If you want to test workflows locally on your private machines, make sure you have the following:
pip(the default Python package manager). Try runningwhich pipin the Terminal.recastcommand line tool (developed on GitHub), which you can install viapython -m pip install recast-atlasdocker(see the Docker Guide for details).
Step-by-Step Guide
Important Notes: If you have requested a repo for your analysis in the dedicated recast-atlas project area (see step 3 in Before you begin):
-
You can skip step 1 (repo creation).
-
Your project will have access to the global CI variables
RECAST_USER,RECAST_PASSandRECAST_TOKENfor the recast-atlas service account. This account can pull images from all gitlab registries with CERN internal permissions, and has access to all files stored under/eos/project/r/recast/atlas. If this account is sufficient for your current needs, you can also skip step 2 (setting CI variables). Keep in mind that eventually your workflow should be able to run using the recast-atlas service account.
Click here to see steps 1 and 2 (creating gitlab repo and setting CI variables)
- Create a new GitLab repository (example name:
recast-myanalysis) using the GitLab interface. - Add the above information (the username, password and access token)


Note: Make sure that the branch you operate on is protected if you mark any variables as protected, or you will get a strange error when you authenticate.
- Clone the repo
- Add some basic ingredients
- Review files and commit
# Replace clone url with your own
git clone https://gitlab.cern.ch/recast-atlas/exotics/ANA-EXOT-2099-099.git
cd ANA-EXOT-2099-099  # Replace with your repo name
curl https://gitlab.cern.ch/recast-atlas/examples/helloworld/-/archive/master/helloworld-master.tar.gz|tar -xzvf - --strip-components 1
git add .
git commit -m 'initial commit'
Here's the setup as a short video:
What's in the repo now?
If you follow the steps above, you should have this layout in the repo:
$> tree -a -I .git
.
├── .gitlab-ci.yml
├── README.md
├── recast.yml
└── specs
    ├── steps.yml
    └── workflow.yml

1 directory, 5 files
-
README.mdThe usual
README.md-- You should add any information you want to this. -
The RECAST catalogue entry
recast.ymlThis file adds some basic information about your analysis.
- Metadata information (Author, Description)
- A
name: feel free to edit this to be something more meaningful - Example inputs. This is useful to quickly run the workflow on pre-defined inputs for testing.
- Results: usually after a workflow execution, the final statistical analysis result is produced. In this section a set of such files can be defined.
-
The workflow definition (
workflow.md) and steps definitionsteps.ymlThis is where you come in. These files hold the details of the analysis and will be the ones you edit most.
-
The CI configuration
.gitlab-ci.yml
Check out the CI
Once the repo is prepared a Continuous Integration pipeline should be run. Looking at the .gitlab-ci.yml we see
the definition:
recast:
  tags:
  - docker-privileged
  services:
  - docker:stable-dind
  stage: build
  image: "recast/recastatlas:v0.3.0"
  script:

  # Authentication. Uncomment the first line if you need to authenticate to pull your analysis image(s). Uncomment the second line if you need to authenticate to download inputs from eos via xrootd
  #- eval "$(recast auth setup -a $RECAST_USER -a $RECAST_PASS -a $RECAST_TOKEN -a default)"
  #- eval "$(recast auth write --basedir authdir)"

  # add the workflow
  # Use a subshell for catalogue add to evaluate the shell export it produces
  - $(recast catalogue add $PWD)
  - recast catalogue ls
  - recast catalogue describe examples/helloworld
  - recast catalogue check examples/helloworld

  # run the workflow
  - recast run examples/helloworld --tag myrun
  artifacts:
    paths:
    - recast-myrun
    expire_in: 1 day
    when: always
That is, the analysis in the current repo dir ($PWD) is:
- added to the RECAST catalogue (
recast catalogue add) - validated (
recast catalogue check examples/helloworld - and executed (
recast run examples/helloworld --tag myrun)
This is what a run looks like:
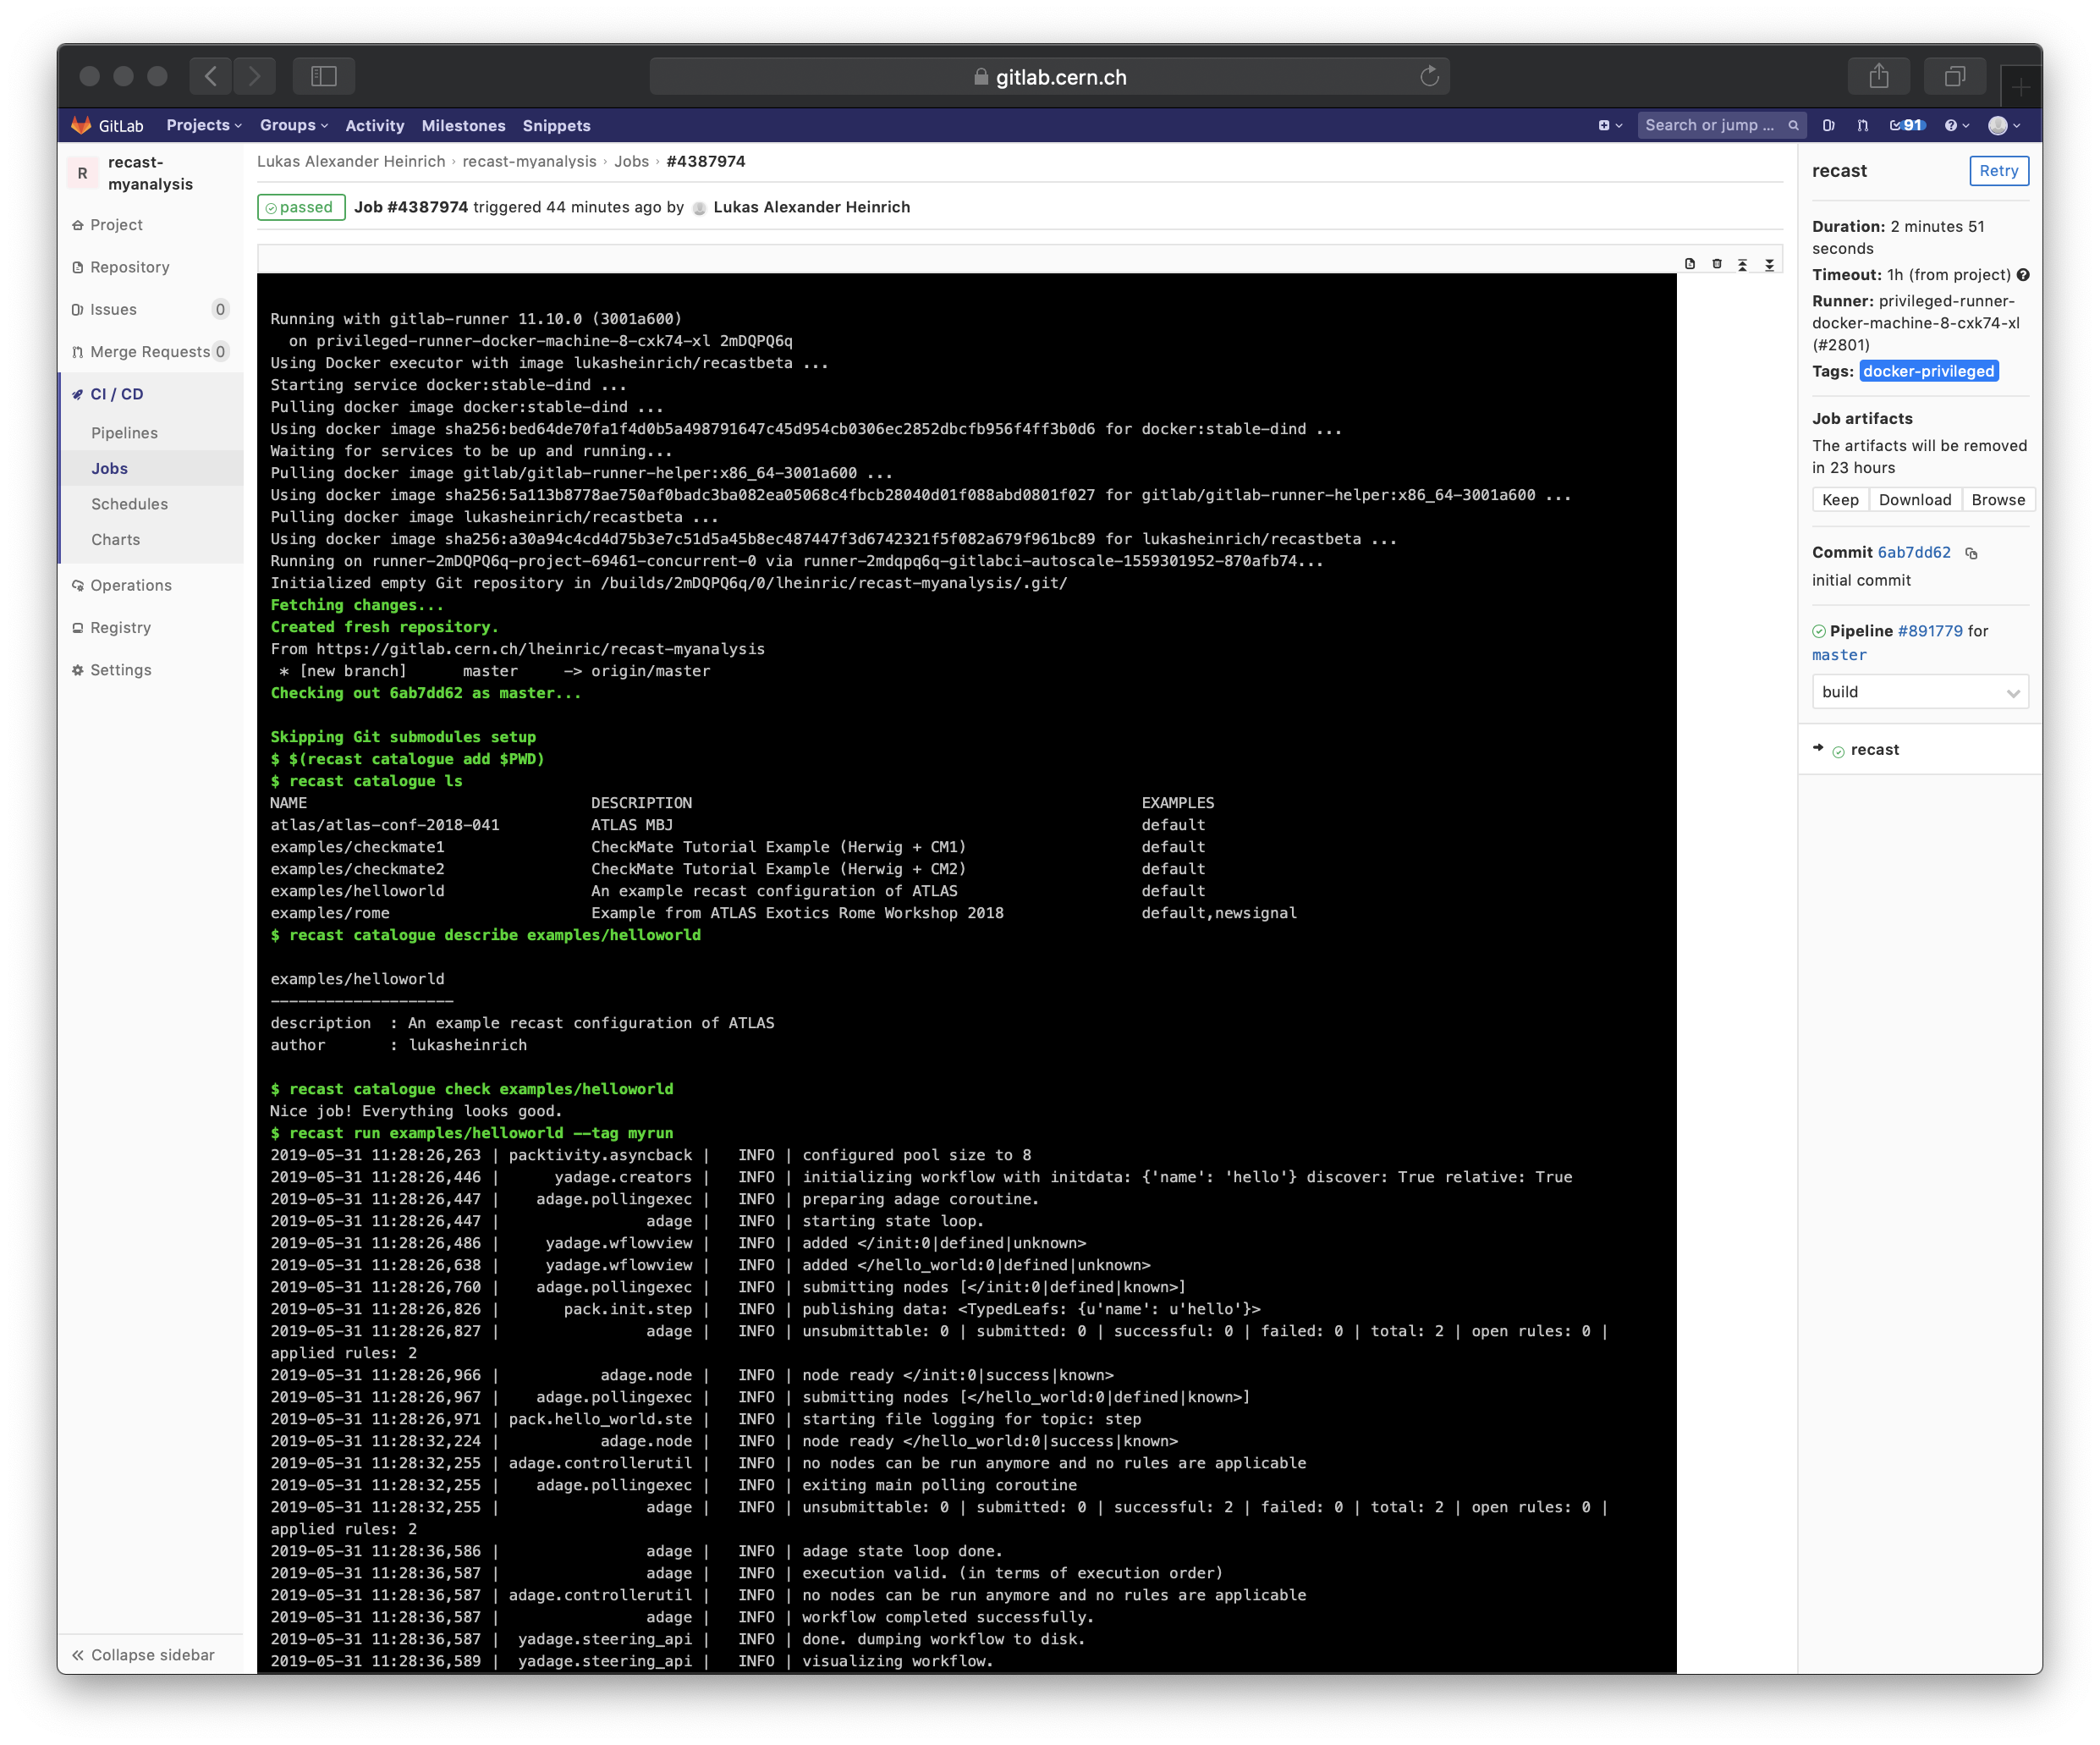
The resulting files are in a directory recast-myrun (the suffix is defined by the --tag option) and GitLab uploads those as artifacts.
You can e.g. view the artifacts by clicking on the "Browse" button on the right hand side.
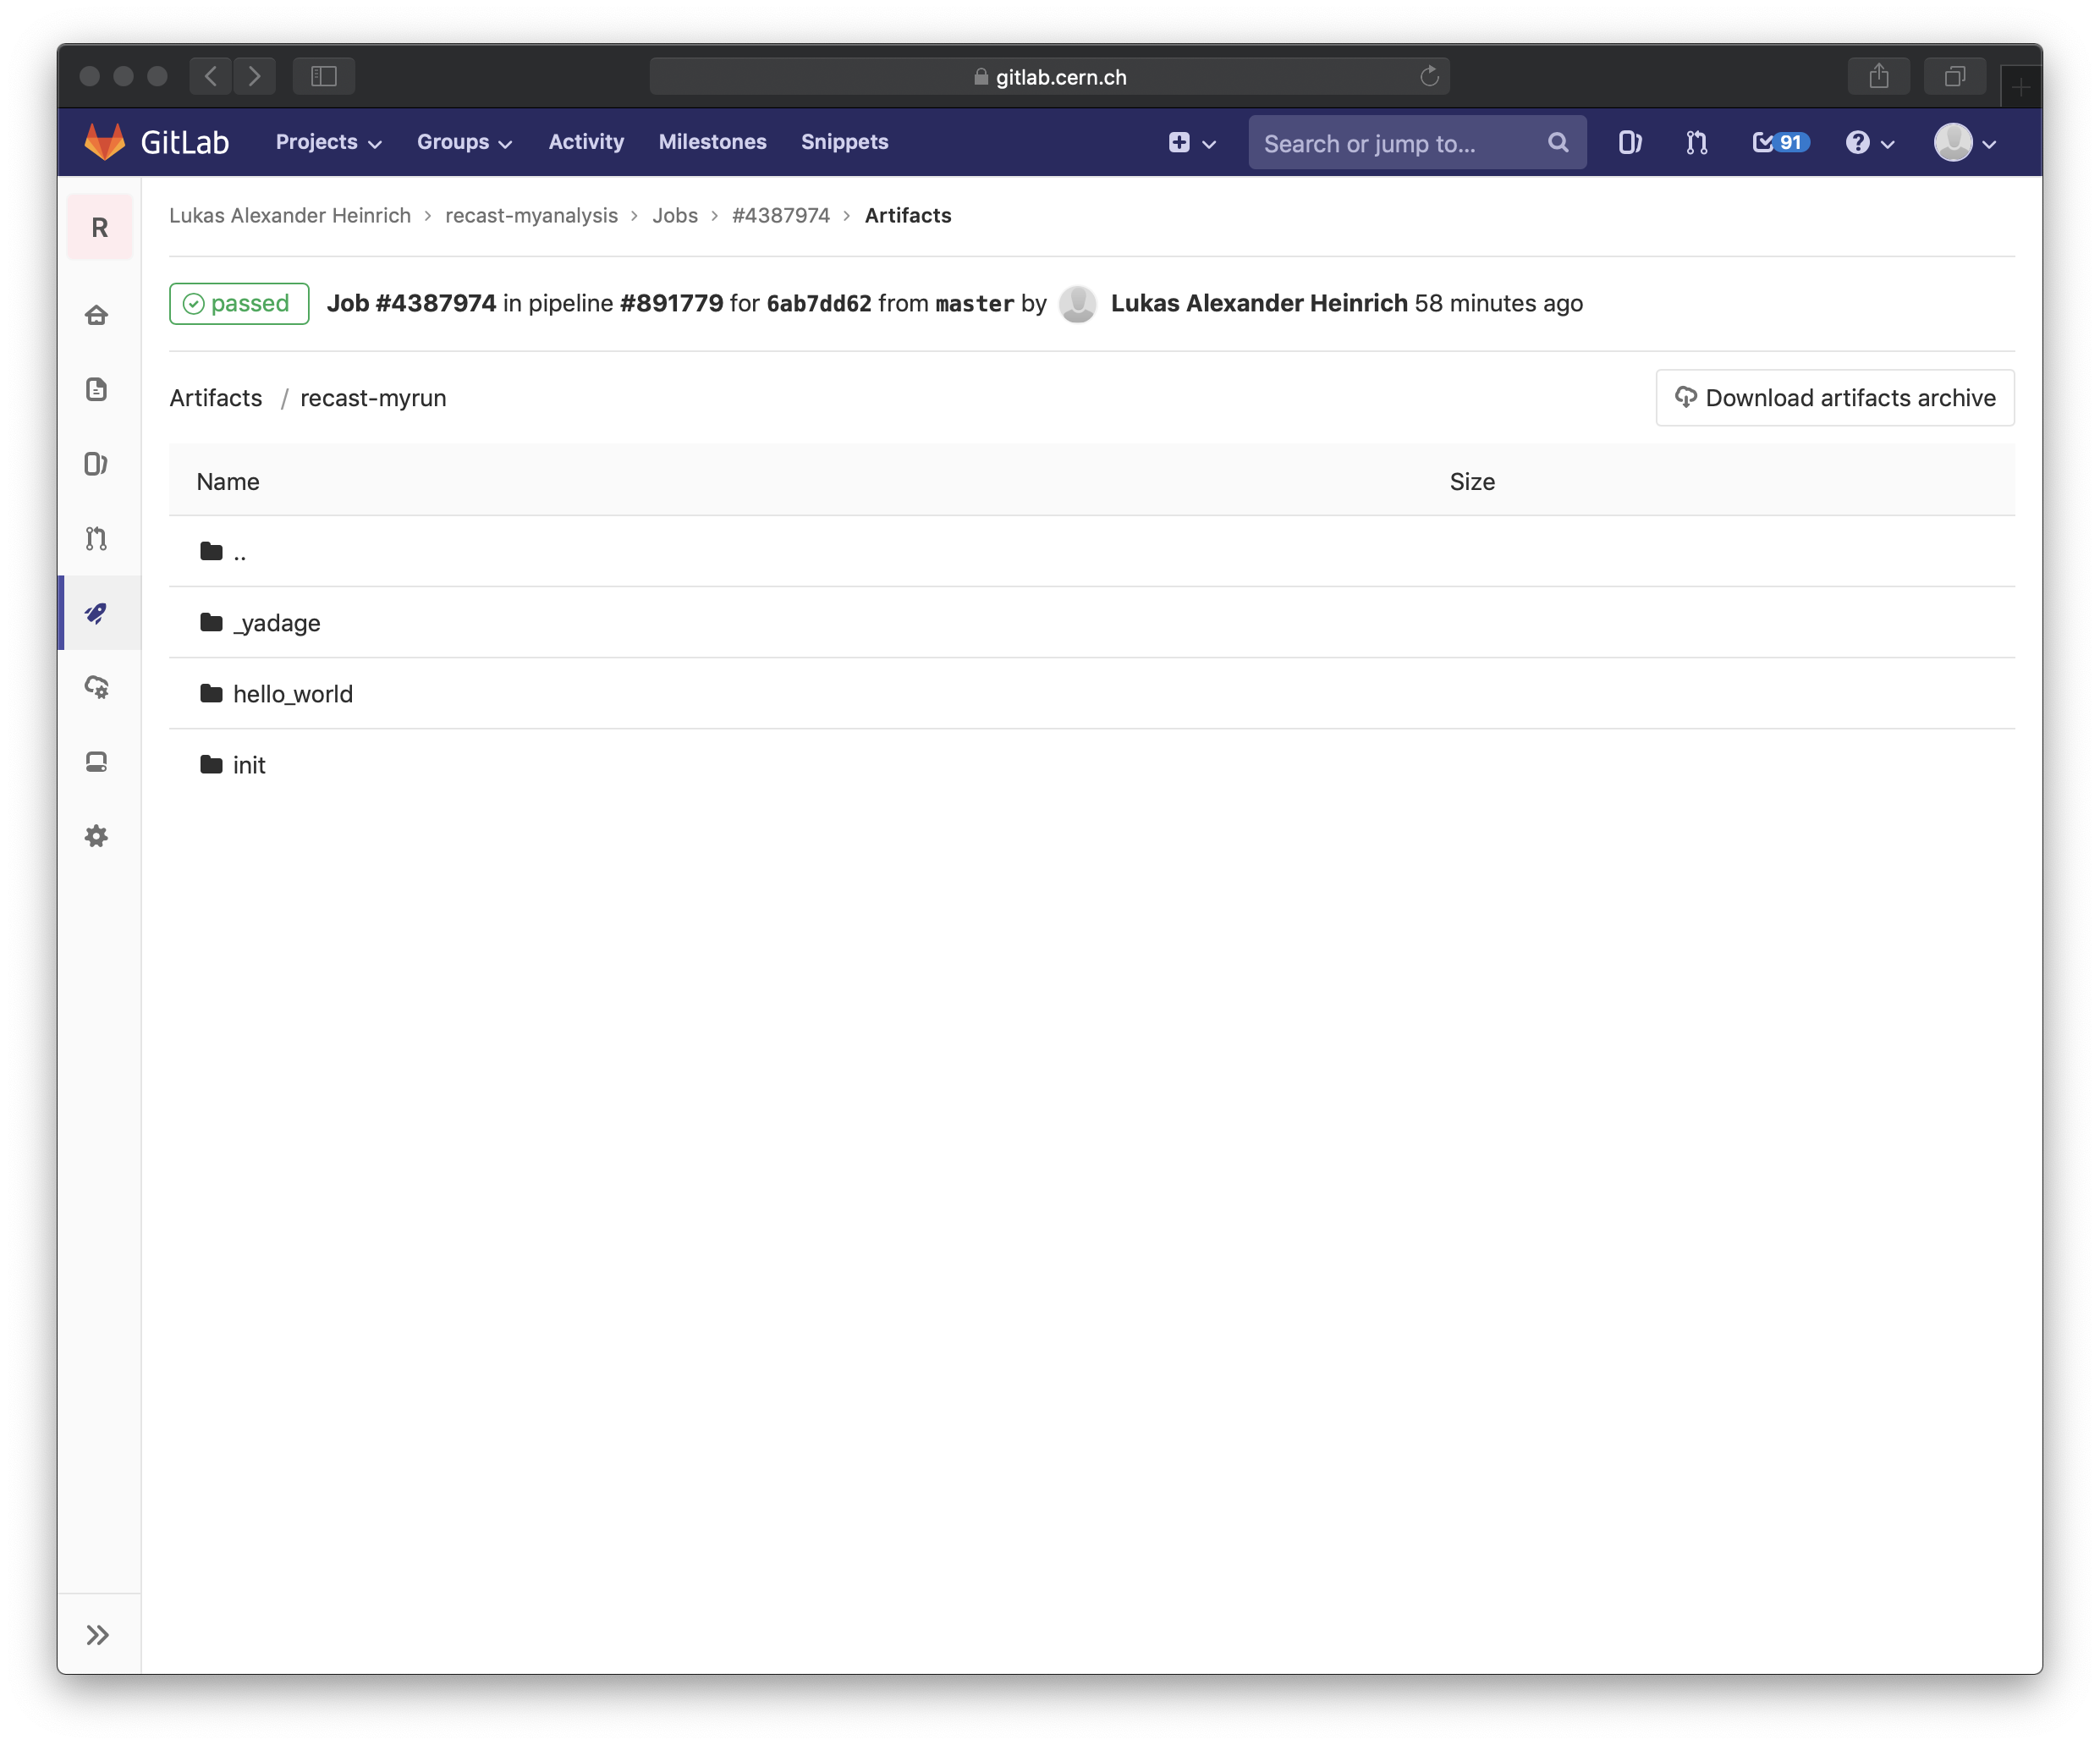
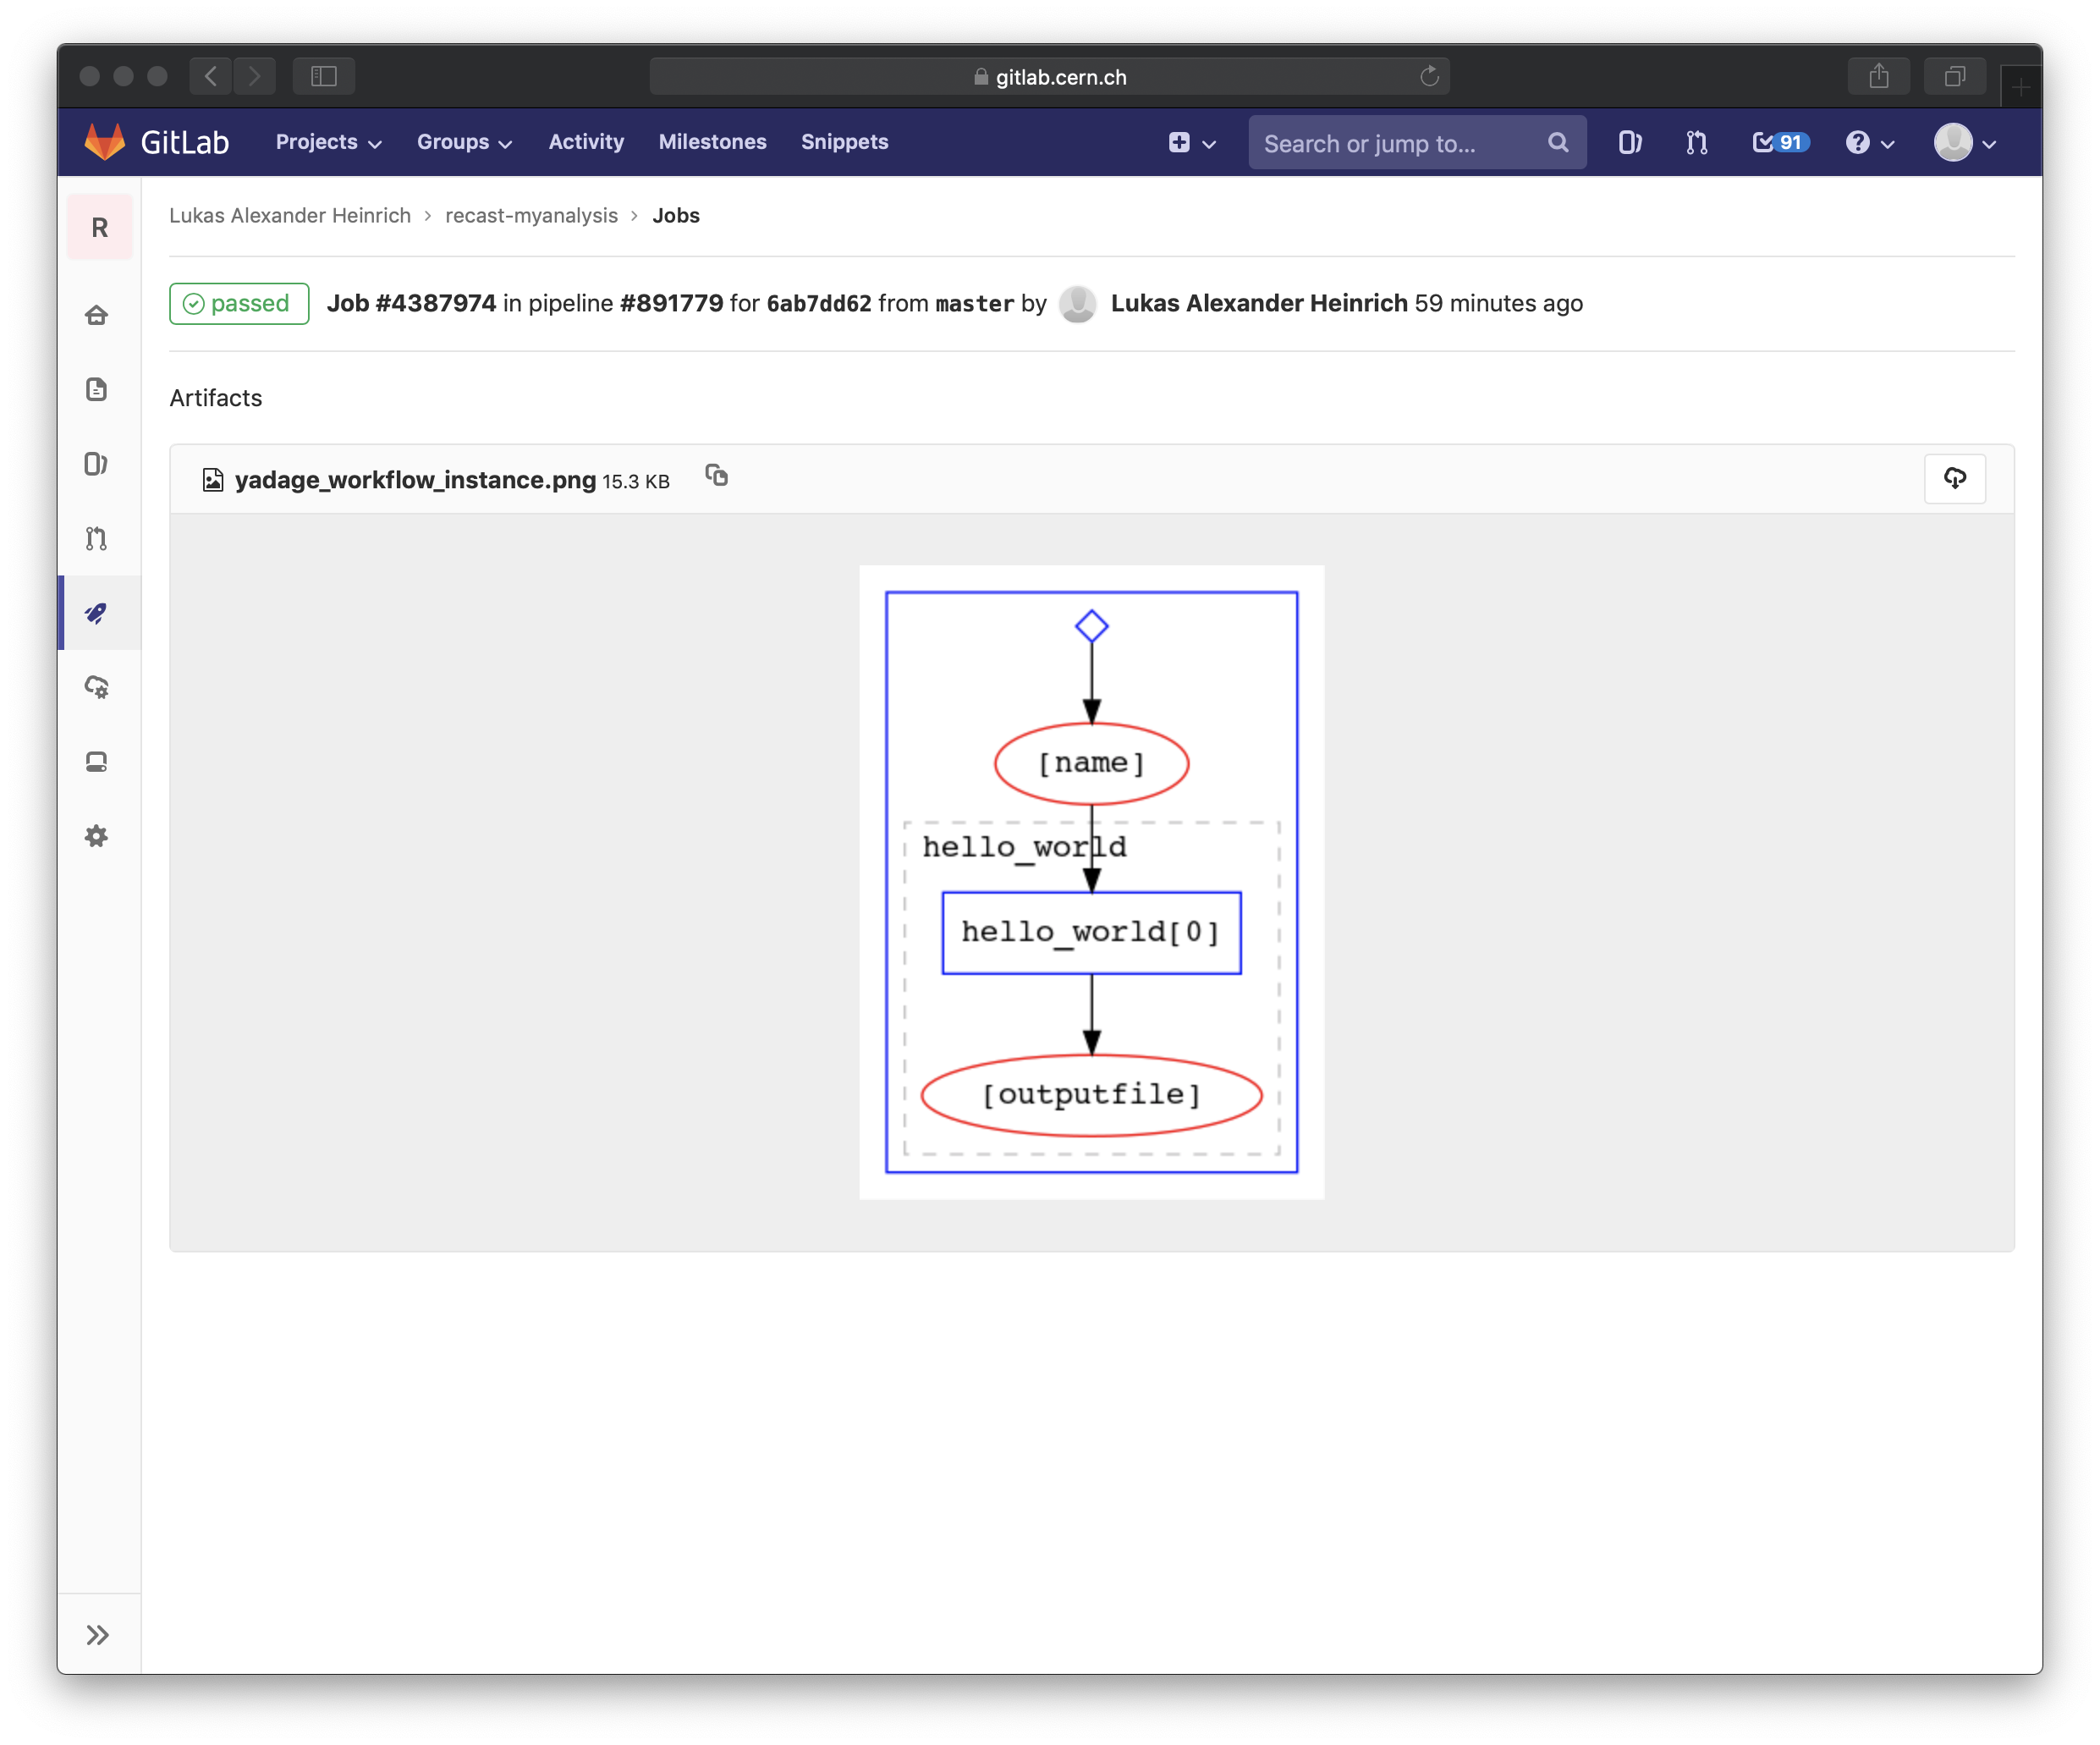
One thing you can look at is the visualization of the workflow (path recast-myrun/_yadage/)
Running the workflow locally using Docker
Once the repository is setup, you can also run the workflow locally on your laptop. For this you need to install the recast command line tool and register your analysis with it as follows.
Install recast-atlas
The recast command line tool is a standard Python package and can be installed using the pip package manager.
(It is usually recommended to create a virtual environment in order to have a clean install (Learn more about virtual environments here Intro to virtualenv) )
python -m venv recastenv
source recastenv/bin/activate
python -m pip install recast-atlas
Here's the above as a short video
Clone your repo and register your analysis with recast
The recast command line tool comes with a few analyses pre-configured in a "Analysis Catalogue". But you can also extend the catalogue to include the analysis you are developing.
git clone https://gitlab.cern.ch/recast-atlas/exotics/ANA-EXOT-2099-099.git
cd ANA-EXOT-2099-099
$(recast catalogue add $PWD)
You will notice that this is similar to what is being done in the CI pipeline.
Setting up access to private images on gitlab and private data on eos
All the images and data in the example workflow are public, but in general your analysis may need to pull CERN-internal images from the gitlab registry, and copy private data stored on eos via xrootd. Here's how to set up the authentication for this:
 # To pull images from a gitlab registry that $RECAST_USER has access to
 eval "$(recast auth setup -a $RECAST_USER -a $RECAST_PASS -a $RECAST_TOKEN -a default)"

 # To access private data that $RECAST_USER has access to on \eos
 eval "$(recast auth write --basedir authdir)"
Running the workflow
recast run examples/helloworld --backend docker
What's next?
In this section you learned how to:
- Define workflows.
- Test workflows in CI and locally.
In the other pages of this section we will discuss how to capture an ATLAS analysis in this way.